Install on windows
1. Download Java JDK for 1.7 version in
http://www.oracle.com/technetwork/java/javase/downloads/java-archive-downloads-javase7-521261.html
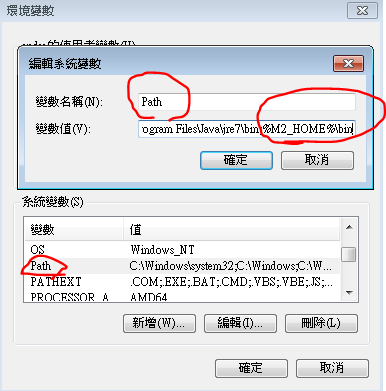
2. Seting JAVA_HOME=C:\Program Files\Java\jdk1.7.0_80
3. Add M2_HOME and MAVEN_HOME
Add both M2_HOME and MAVEN_HOME variables in the Windows environment, and point it to your Maven folder.
Reference:
http://roufid.com/no-compiler-is-provided-in-this-environment/
https://www.mkyong.com/maven/how-to-install-maven-in-windows/
Running simple maven my-app
This will build the project call my-app and
- mvn archetype:generate -DgroupId=com.mycompany.app -DartifactId=my-app -DarchetypeArtifactId=maven-archetype-quickstart -DinteractiveMode=false

- project This is the top-level element in all Maven pom.xml files.
- modelVersion This element indicates what version of the object model this POM is using. The version of the model itself changes very infrequently but it is mandatory in order to ensure stability of use if and when the Maven developers deem it necessary to change the model.
- groupId This element indicates the unique identifier of the organization or group that created the project. The groupId is one of the key identifiers of a project and is typically based on the fully qualified domain name of your organization. For example org.apache.maven.plugins is the designated groupId for all Maven plugins.
- artifactId This element indicates the unique base name of the primary artifact being generated by this project. The primary artifact for a project is typically a JAR file. Secondary artifacts like source bundles also use the artifactId as part of their final name. A typical artifact produced by Maven would have the form <artifactId>-<version>.<extension> (for example, myapp-1.0.jar).
- packaging This element indicates the package type to be used by this artifact (e.g. JAR, WAR, EAR, etc.). This not only means if the artifact produced is JAR, WAR, or EAR but can also indicate a specific lifecycle to use as part of the build process. (The lifecycle is a topic we will deal with further on in the guide. For now, just keep in mind that the indicated packaging of a project can play a part in customizing the build lifecycle.) The default value for the packaging element is JAR so you do not have to specify this for most projects.
- version This element indicates the version of the artifact generated by the project. Maven goes a long way to help you with version management and you will often see the SNAPSHOT designator in a version, which indicates that a project is in a state of development. We will discuss the use of snapshots and how they work further on in this guide.
- name This element indicates the display name used for the project. This is often used in Maven's generated documentation.
- url This element indicates where the project's site can be found. This is often used in Maven's generated documentation.
- description This element provides a basic description of your project. This is often used in Maven's generated documentatio
Build project
- mvn package 會製作出 jar 檔
2. mvn compile
3. mvn exec:java -Dexec.mainClass=com.mycompany.app.App
4. man install store in the local repo
Running maven web
Command:
mvn archetype:generate -DgroupId=com.myMaven.app -DartifactId=HelloJavaWeb -DarchetypeArtifactId=maven-archetype-webapp -DinteractiveMode=false
mvn package : 會建立 war 檔
mvn jetty:run
mvn jetty:run
jetty reference: https://www.mkyong.com/maven/maven-jetty-plugin-examples/
How to do add other jar file
增加相關jar檔
當我們想要使用一些套件時,這時候Maven要怎麼做呢?
舉例來說,想使用mysql的時候,
就把mysql的dependency資訊加入pom.xml檔
Maven會幫我們把這些jar檔一起封裝進來
修改pom.xml檔,加入 mysql的套件資訊
dependency的套件資訊可以在下列位置找到
http://mvnrepository.com/
加入 dependency 到 pom.xml
如何找套件
建立套件並自動下載
war 放置 jar
舉例來說,如果我們想使用A套件
但使用A套件必須要有B套件跟C套件,
這時候我們不必費心去找B,C套件,
甚至連A套件需要什麼相依套件我們都不用知道
只要在pom.xm中設定,
Maven都會幫我們準備好.
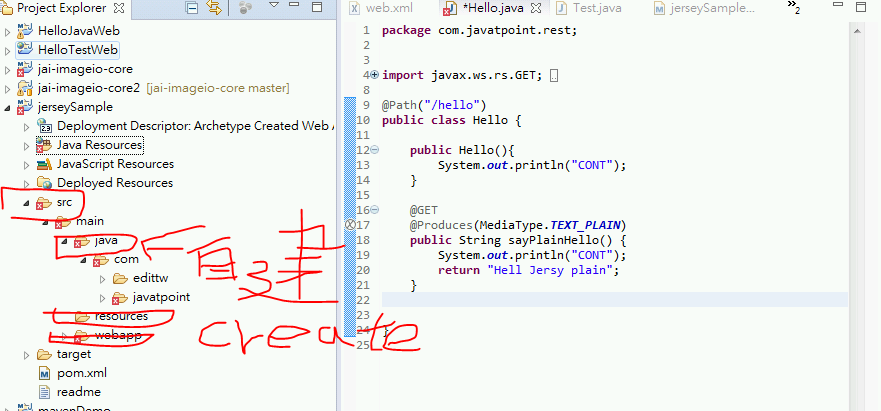
Running with eclipse
.將Maven專案轉成eclipse專案
要導入一個已經存在的Maven專案
我們必須要先把Maven專案轉成Eclipse可以使用的專案格式
在Maven專案的資料夾內(pom.xml存在的那層)輸入
mvn eclipse:eclipse
Maven會產生Eclipse需要的檔案
Eclipse 使用的是 eclipse-jee-mars-2-win32-x86_64
開啟 Eclipse 並 import 轉好 maven 檔案
加入 log4j 至 Pom.xml
Eclipse Setting Maven
Nothing special, M2_REPO is just a normal “classpath variable” in Eclipse to find your local Maven repository.
Eclipse 製作 Maven project
選定建立目錄
專案設定
執行一樣用 package
加入 javax.servlet
設定 servrlet in the main